How to play Cue Ball Angle Trainer
Cue Ball Angle Trainer is a free pool (billiards) practice game that runs in your browser. It uses real-world pool physics (real ball and table sizes, ball–ball friction and throw, cloth friction, spin, cushion rebound, squirt) – see section 12. There is no opponent and no timer. Before every shot the game draws exactly what the physics will do – where the object ball goes, where the cue ball goes afterwards, and how much the balls “throw” – and after the shot it shows what really happened. You learn by placing a position, predicting, shooting and comparing.
Contents: 1 Quick start · 2 The screen · 3 Ball and pocket · 4 Reading the lines · 5 Aim · 6 Cheat and thick/thin · 7 Spin · 8 Power and shooting · 9 Results · 10 Guess mode · 11 Modes and drills · 12 Real physics · 13 Ideas to learn · 14 Practice plan · 15 Questions
1. Quick start
- Landscape. The game is made for a wide screen. On a phone or tablet turn the device sideways (or press Start playing). On a computer just open the page.
- Set up any position you like. Drag the cue ball or any object ball wherever you want to practise – you can do this at any moment.
- Look at the plan. The game has already chosen an object ball and the best pocket (Auto mode) and drew the line the cue ball must follow.
- Shoot. Put a finger (or the mouse) on the long cue bar at the right edge, pull it down and let go. The farther you pull, the harder the shot.
- Compare. Watch the balls. Press Replay to see it again, Redo to try the same position, or just drag the balls into a new position.
2. The screen
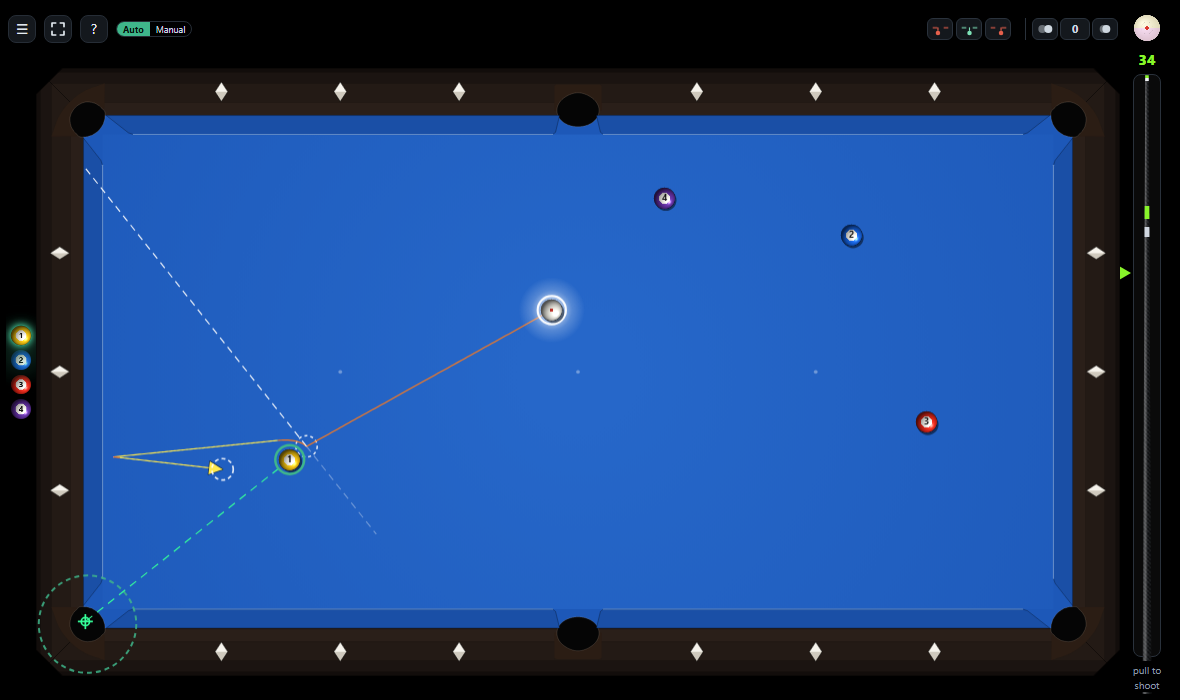
| Where | What it is |
|---|---|
| ☰ (top left) | Options panel: analysis of the shot, mode, number of balls, guess mode, speed, drill card. |
| Auto / Manual | Who chooses the aim: the game (Auto) or you (Manual). |
| Five pocket buttons (top centre) | “Cheat the pocket”: aim at a different part of the pocket mouth, from the left jaw to the right jaw. Green = this aim pots the ball, red = it does not. |
| Cross-hair, − value + | Auto thin/thick, and thinner / thicker hit in steps of 1/32 of a ball. |
| Replay / Redo / ✕ | Appear after a shot: replay it, retry the same position, or close this bar. |
| Text above the table | The throw of the shot set up now (see section 9). |
| Text under the table | Last shot: what was actually played, and the same shot at the default power. |
| Ball row (left edge) | Shows the numbered balls still on the table (potted ones are greyed). The lit one is the object ball. It is a display, not a button. |
| Small cue ball (top right) | Where you hit the cue ball: follow, draw, side spin (section 7). |
| Green number and cue bar (right edge) | The power (0–100) and the bar you pull to shoot. The green marker on the bar is the default power. |
3. Choosing the ball and the pocket
- Object ball. In Free play the object ball is always the lowest-numbered ball on the table (the game lights it in the ball row); tapping another ball only shows the reminder “Always hit the lowest ball first”. In the corner-box and small-area drills the order is free: the game suggests a makeable ball and you may tap any other ball to shoot it instead. After a ball is potted the next one is chosen automatically.
- Pocket. In Auto the game picks the “Best pocket” and tells you the cut angle and the distance (“Top-right corner, cut 7.9°, ball → pocket 0.66 m”). To choose yourself, tap a pocket: the options panel then says “pocket chosen by you”. Tap the same pocket again, or press Auto pocket, to give the choice back to the game.
- Move any ball, any time. This is a trainer: press a ball – the cue ball or any object ball – and drag it to a new place whenever you like: before aiming, while aiming, right after a shot, in Free play and in every drill. The plan is redrawn as you drag. Balls stay on the table and cannot overlap; a ball left very close to another is pushed apart before the next plan. Use Redo to put the balls back where they were before your last shot.
- Warnings. If a ball is in the way the options panel shows “Ball in the way (aim line)” or “(pocket line)”. A cut of 80° or more shows “Cut too thin – hard to pot”.
How to move the balls (step by step)
- Press on the ball you want to move – the white cue ball or any numbered ball. Press on the ball or just beside it: on a touch screen the catch area is about a fingertip wide (so small screens are easy too), and when two balls are close together the one nearest to your finger is picked.
- Drag it across the table without lifting. It follows your finger or mouse, stays inside the cushions and the plan (lines, throw, cue-ball path) redraws as you move.
- Lift to drop it. Nothing else changes: the object ball, the pocket and your spin and power settings stay as they were.
- Dragging never needs a special mode: it works in Auto and in Manual, in Free play and in every drill. If the spot you drag to would overlap another ball the ball simply stays where it last fitted. Moving a ball clears the cheat and thick/thin settings, because the old aim no longer fits.
- Want the old position back? Press Redo (after a shot) to put all balls where they were before it. Random in ☰ deals a new Free-play layout, and New drill resets a drill.
Tip: to test how sensitive a shot is, drag the cue ball a few centimetres, look at how the cut angle, the throw and the exit angle change, then drag it back.
Full screen, and where to find help
- Full screen: the button with four corners next to ☰ (top left) – also in the ☰ panel – enters full screen and hides the browser bars. The same button, now with the corners pointing inward, exits full screen (on a computer Esc works too). On Android and computers it also asks the screen to stay in landscape.
- iPhone: Safari cannot make a web page full screen. Tap Share → Add to Home Screen and open the game from the new icon: it then runs without the browser bars.
- Help: the ? button next to the full-screen button (and the “Hard to play?” link at the top of the ☰ panel) opens this page. If a shot or a control confuses you, come back here.
4. Reading the lines on the table
| You see | It means |
|---|---|
| Line from the cue ball to a small dashed circle | The path of the cue ball to the ghost ball. Its colour shows how the ball moves: magenta = backspin, orange = sliding, yellow = rolling. |
| Dashed circle next to the object ball | The ghost ball: where the cue ball is at the moment of contact. |
| Green dashed line with a cross-hair | The path of the object ball to the aim point in the pocket. The big dashed circle around the pocket is the range of the pocket-cheat buttons. |
| Long white dashed line through the ghost ball | The 90° line (tangent): where a stop-shot cue ball would go. |
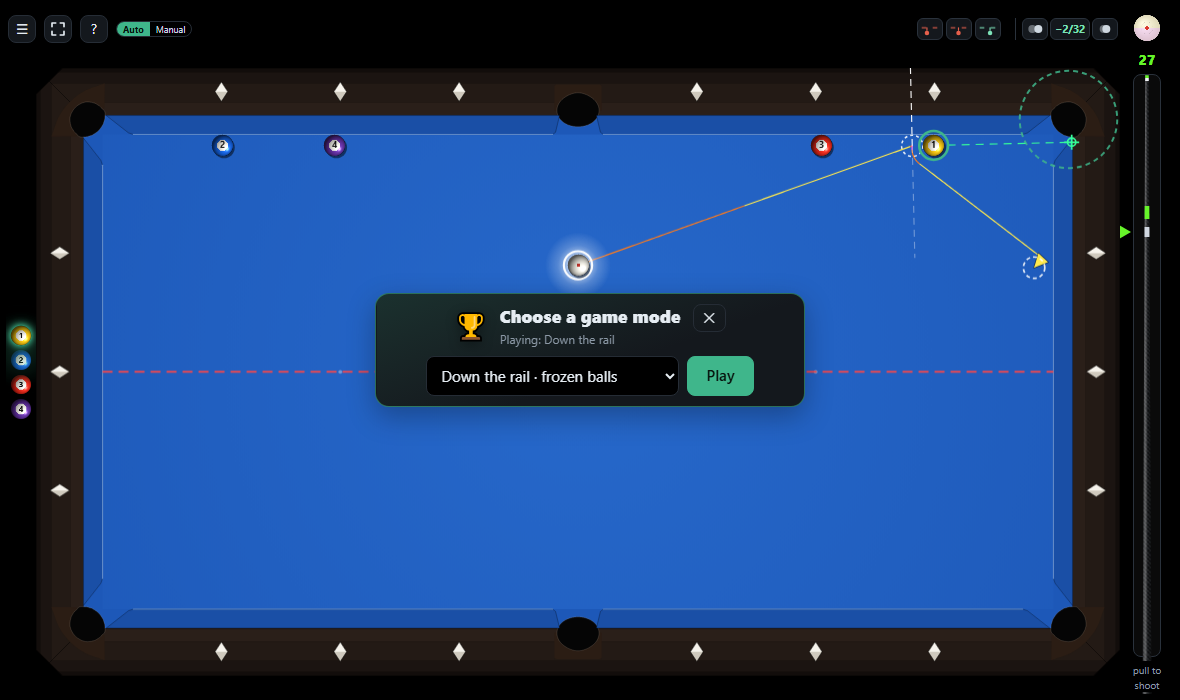
| Yellow line with an arrow after the contact | Where the cue ball goes afterwards, including cushions. The little circle at its end is where it stops. |
| Pink dashed line with a dot | Your guess in Guess mode (section 10). |
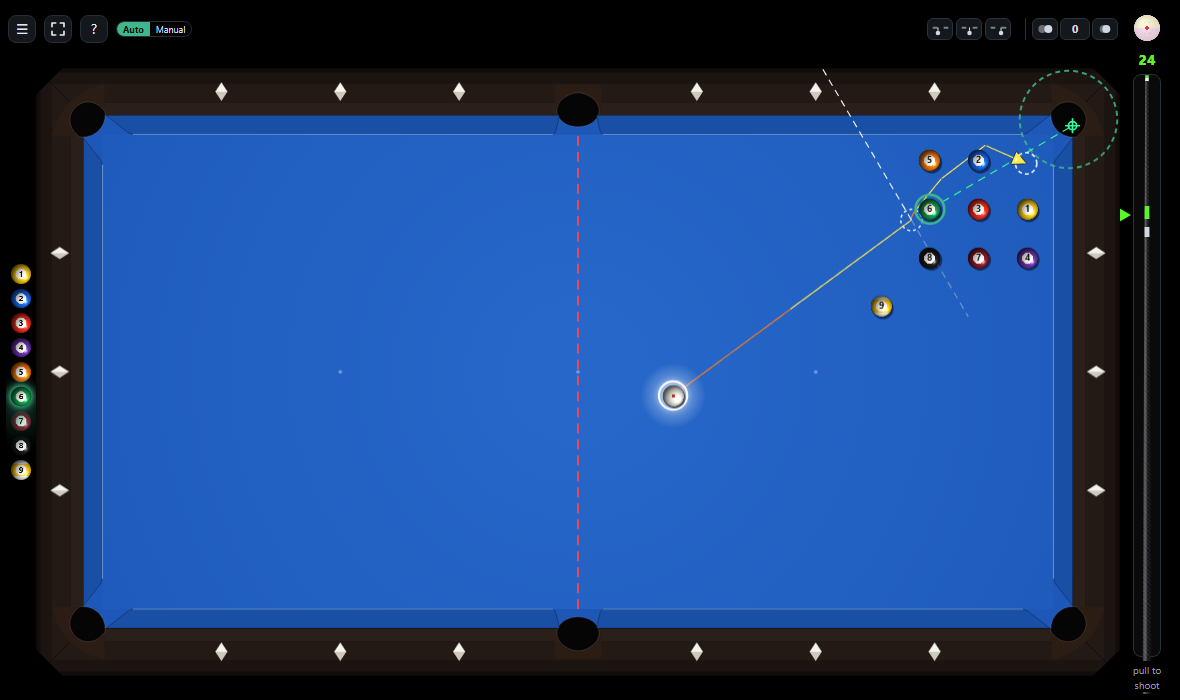
| Red dashed line across the table | The “centre line” of a drill that forbids the cue ball to cross it. |
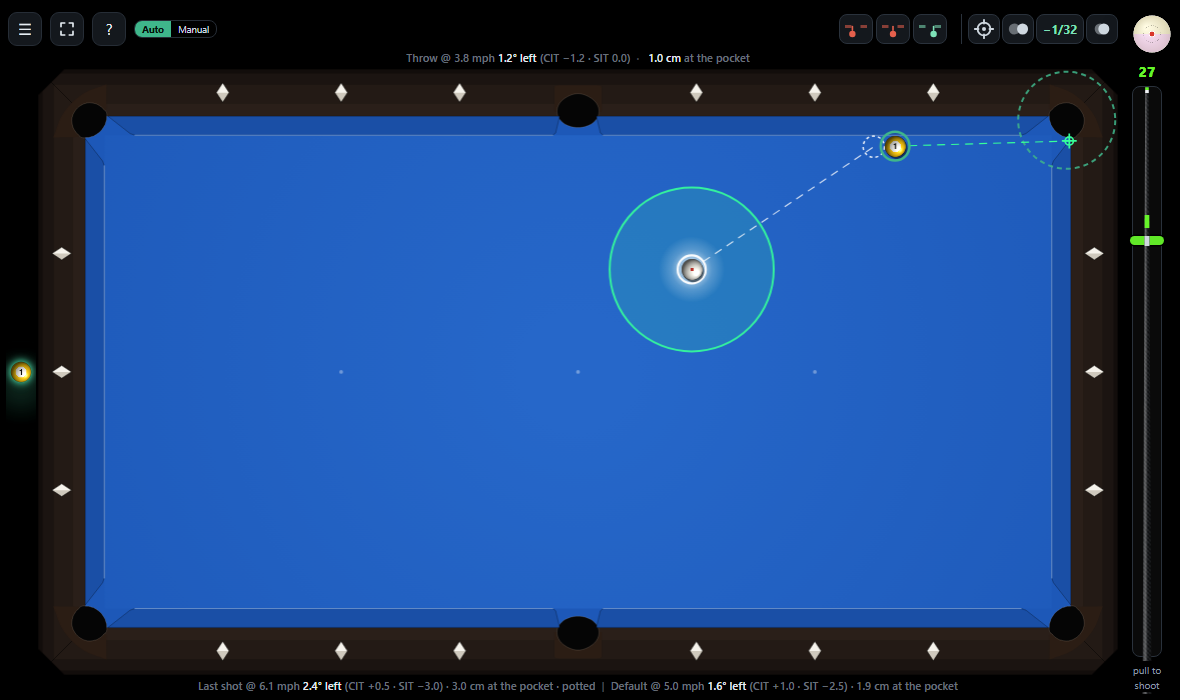
| Green disc on the table | The target zone of a drill: the cue ball must stop inside it. |
5. Aim: Auto and Manual
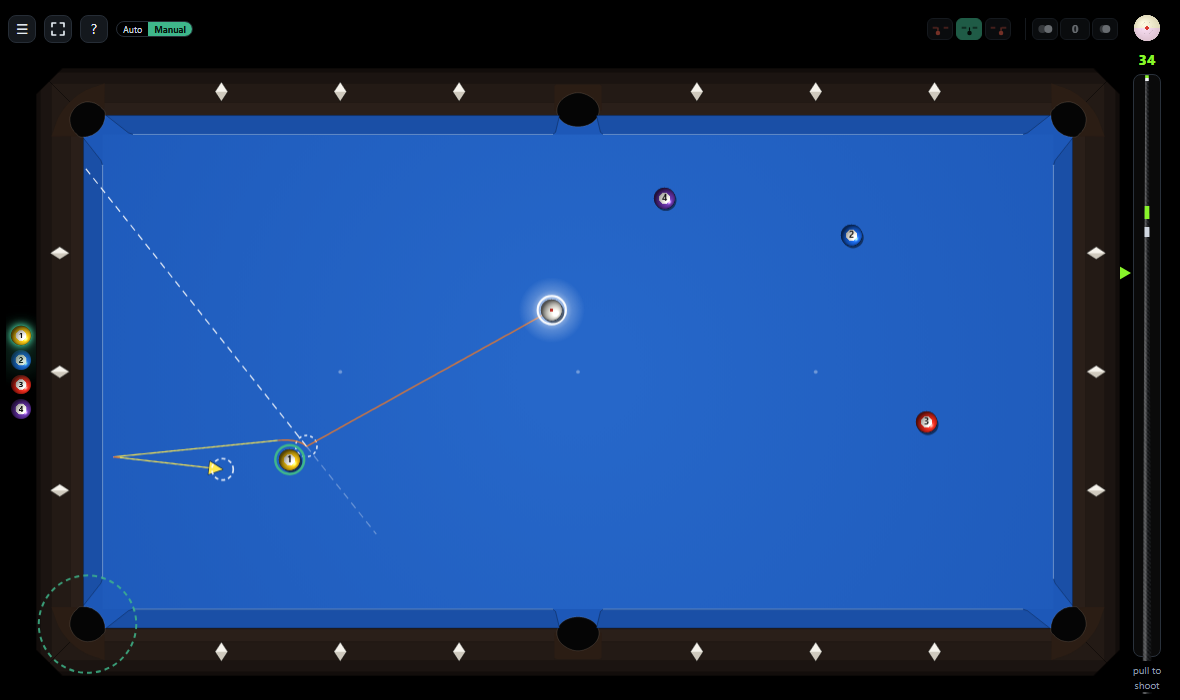
- Auto solves the aim for you: it finds the line that pots the chosen ball in the chosen pocket, including the effect of the spin and the power you set (“Aim offset (auto spin / power compensation)” in the options panel says by how many degrees it moved the aim). If no aim can pot the ball it shows MISSED in the prediction.
- Manual lets you place the aim yourself: press anywhere on the table and the cue ball line turns toward your finger (a long white dashed line shows it). While the line is still far from the object ball it follows your finger directly. Once it crosses the contact zone of the object ball the game switches to fine aim: your finger now nudges the line at one fifth of its movement and the contact point snaps to 1/32 of a ball, with a label such as “Fine aim · 3/32 ball →”. Fine aim then stays on until you lift your finger, so a slip of the hand only nudges the line a little and never throws it away. Lift to keep the aim, then pull the cue. Dragging a ball or tapping a pocket in Manual mode works as usual.
- In both modes the plan is redrawn immediately when you change spin, power, pocket, thick/thin or cheat.
6. Fine control: cheat the pocket and thick/thin
Cheat the pocket (five buttons)
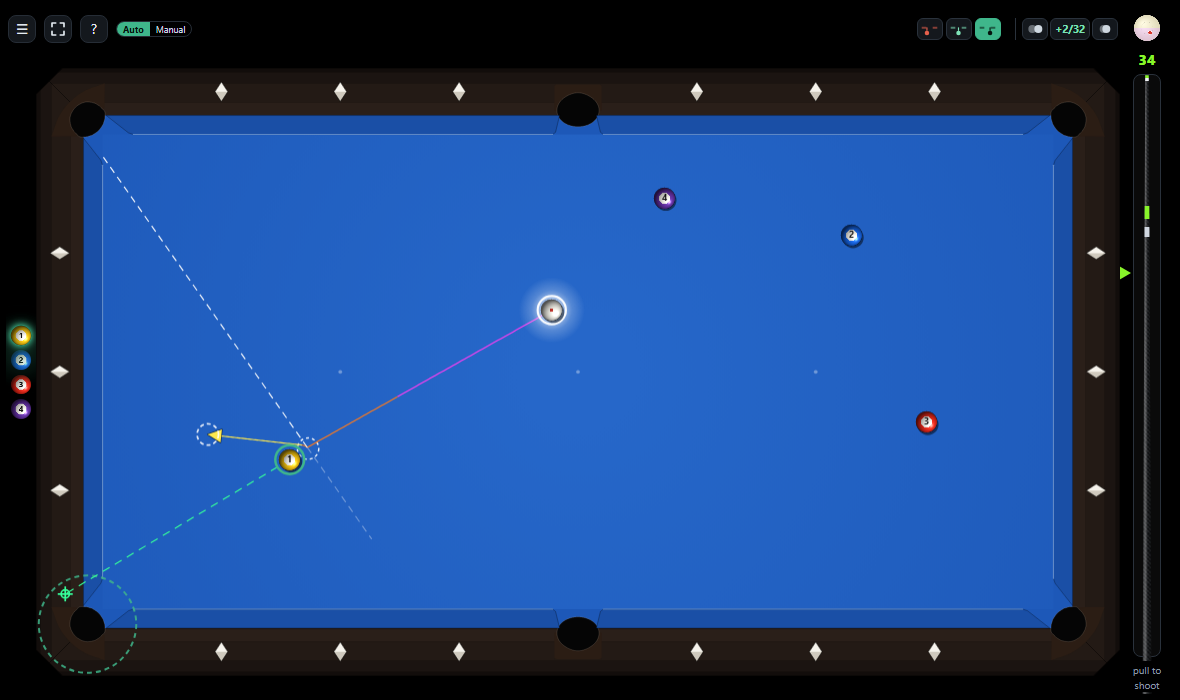
A pocket is wider than a ball, so the object ball does not have to aim at its centre. The five buttons move the aim point across the pocket mouth: far left jaw, half left, centre, half right, far right jaw. Each button is green when that aim still pots the ball and red when it would miss. Deep pockets accept balls over a wider range than shallow ones. Use the buttons to see how much room you really have, or press the lit button again to go back to the game’s choice.
Thicker or thinner (1/32 of a ball)
The buttons beside the value change the cut by 1/32 of a ball at a time (“+2/32” = two thirty-seconds thicker, “−1/32” = thinner). Tap the value to reset to 0. The cross-hair button (Auto) finds the offset that pots the ball. This is essential for frozen balls (touching the cushion): they only drop with a slightly thinner hit.
7. Spin: where the tip hits the cue ball
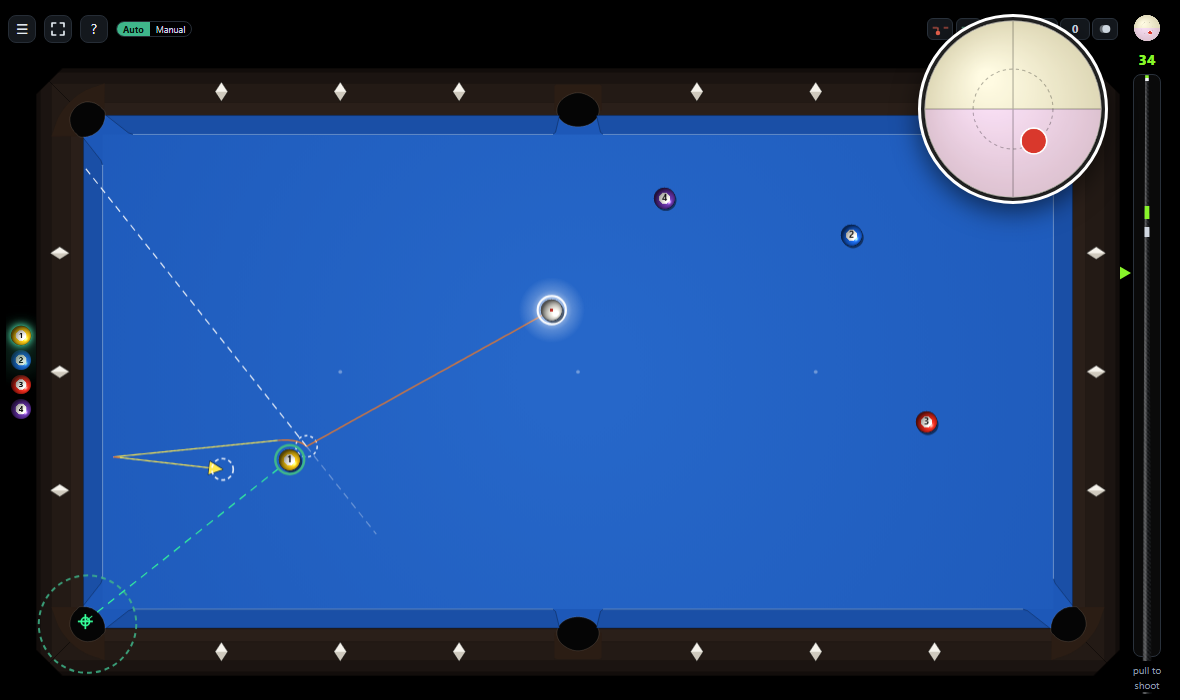
- Press and hold the small cue ball at the top right. A big copy appears next to it.
- Drag without lifting: the dot moves relative to your finger, so you can place it precisely. The top half (cream) is follow, the bottom half (pink) is draw, the left and right halves are side spin. The centre is a plain hit.
- Release. The choice is kept until you change it. A line in the options panel names it, for example “Draw medium · right spin light”, and the aim line, throw and cue-ball path update at once.
| Contact | Effect |
|---|---|
| Centre or slightly low | Stop shot: on a straight shot the cue ball stops where the object ball was. |
| Above centre (follow) | The cue ball keeps rolling forward after contact and follows the object ball. |
| Below centre (draw) | The cue ball spins backwards: after contact it leaves along the 90° line, then the backspin grips the cloth and bends the path back toward you. |
| Left / right (side spin) | Changes the angle off cushions and adds spin-induced throw (section 9). In Auto the game compensates the aim for the swerve. |
8. Power and shooting
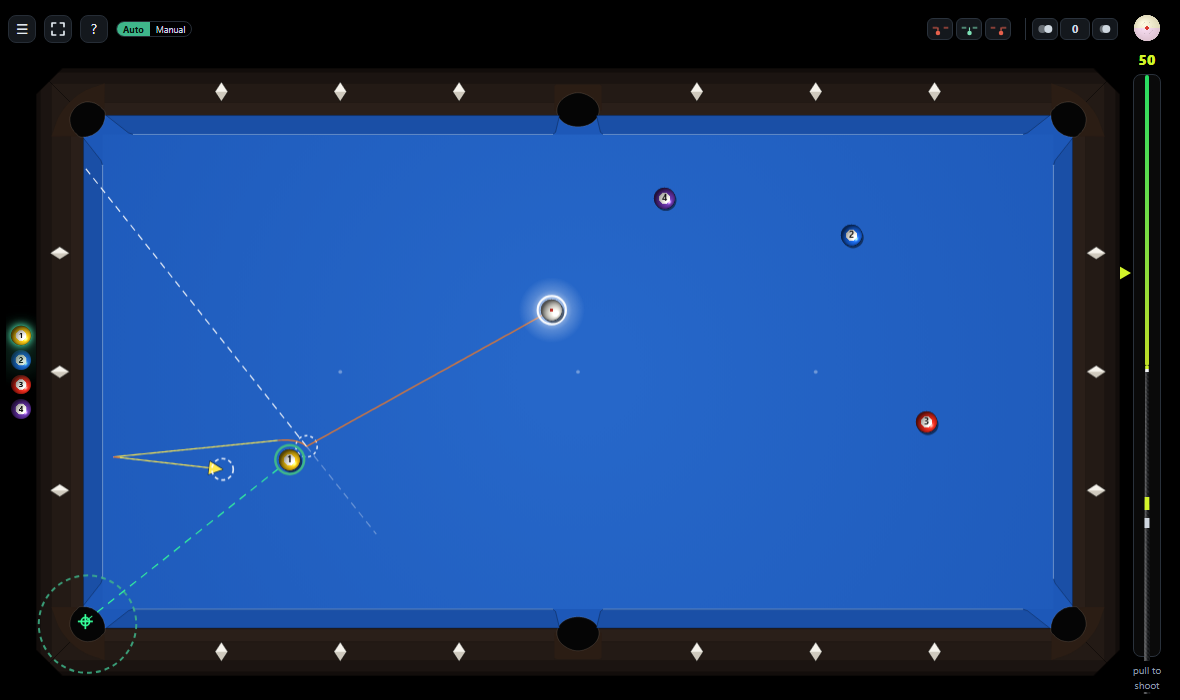
- Pull the cue bar (right edge) downwards and release to shoot. The number above it (0–100) is the power; the text above the table shows the speed in mph.
- The marker on the bar is the default power. Everything drawn on the table is the plan at that power. Drag the marker to change the default and the lines update while you drag.
- When you pull to a different power, the game re-plans at the power you pulled (the aim is solved again for that speed) and plays exactly that shot.
- If the power is so low that the cue ball cannot reach any ball, the panel says “The cue ball stops before reaching a ball”.
9. Reading the results
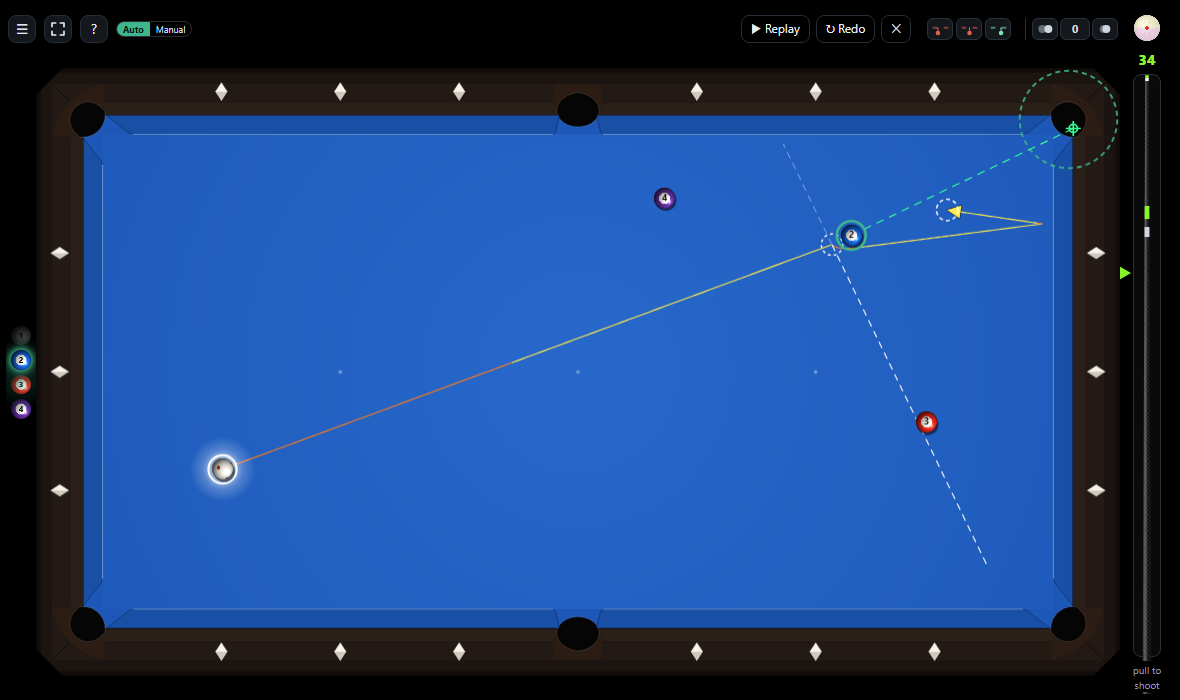
The two text lines
- Above the table – “Throw”: the plan for the shot set up now, at the default power: speed in mph, then the throw: how many degrees the object ball leaves to the left or right of the line through the two ball centres, split into CIT (cut-induced throw, from the cut itself) and SIT (spin-induced throw, from side spin on the cue ball; 0 without side spin), and the same amount in centimetres at the pocket.
- Under the table – “Last shot”: the shot as it was played (power, throw, CIT/SIT, cm at the pocket, potted or missed). If you pulled the cue to a power different from the default, “Default” shows the throw of that same shot at the default power. If you used the default, it says “played at the default power”.
Right = to the right as you look along the shot. The game does not tell you how to correct the throw – the numbers are there so you can learn it.
The options panel (☰)
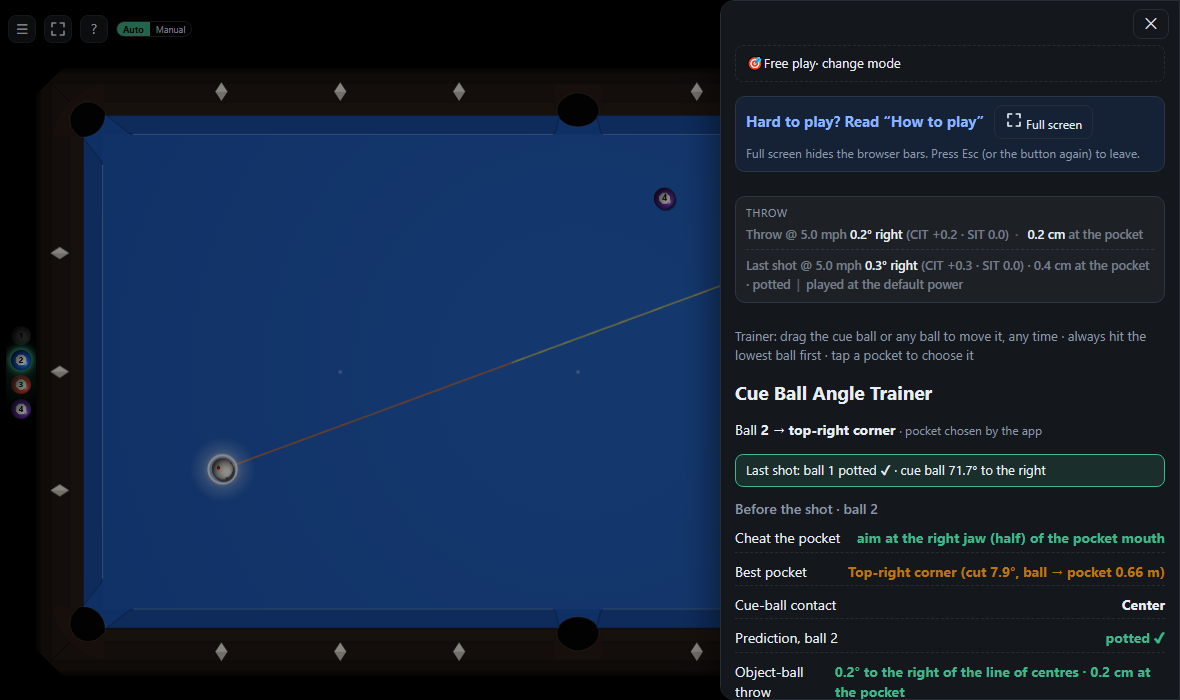
| Row | Meaning |
|---|---|
| Last shot | Summary: whether the ball was potted and the angle the cue ball left at. |
| Best pocket / Pocket | Which pocket, the cut angle (how far the object ball is cut from straight) and the distance object ball → pocket. |
| Cue-ball contact | The spin you chose. |
| Prediction | “potted ✔” or “MISSED” for the current plan. |
| Object-ball throw / CIT / SIT | As above, in degrees and cm. |
| Exit angle vs the 90° line | How far the cue ball leaves from the 90° line (to the left = behind it, to the right = ahead of it). |
| Offset from the aim line | The angle between the original aim line and the direction the cue ball leaves in. |
| Cue ball afterwards | Whether it hits cushions (“hits 1 cushion, then stops”) or runs straight. |
| Before contact / After contact | How far the cue ball slides and rolls, e.g. “sliding 82 cm → rolling 91 cm”. |
| Cut angle needed, Object ball heads, Distance cue ball → ghost ball | Geometry of the shot being aimed. |
| After a shot: Actual cut angle, Angle between the balls after contact, Deviation from the 90° tangent, Cue-ball speed after contact | What really happened, to compare with the plan. |
10. Guess mode
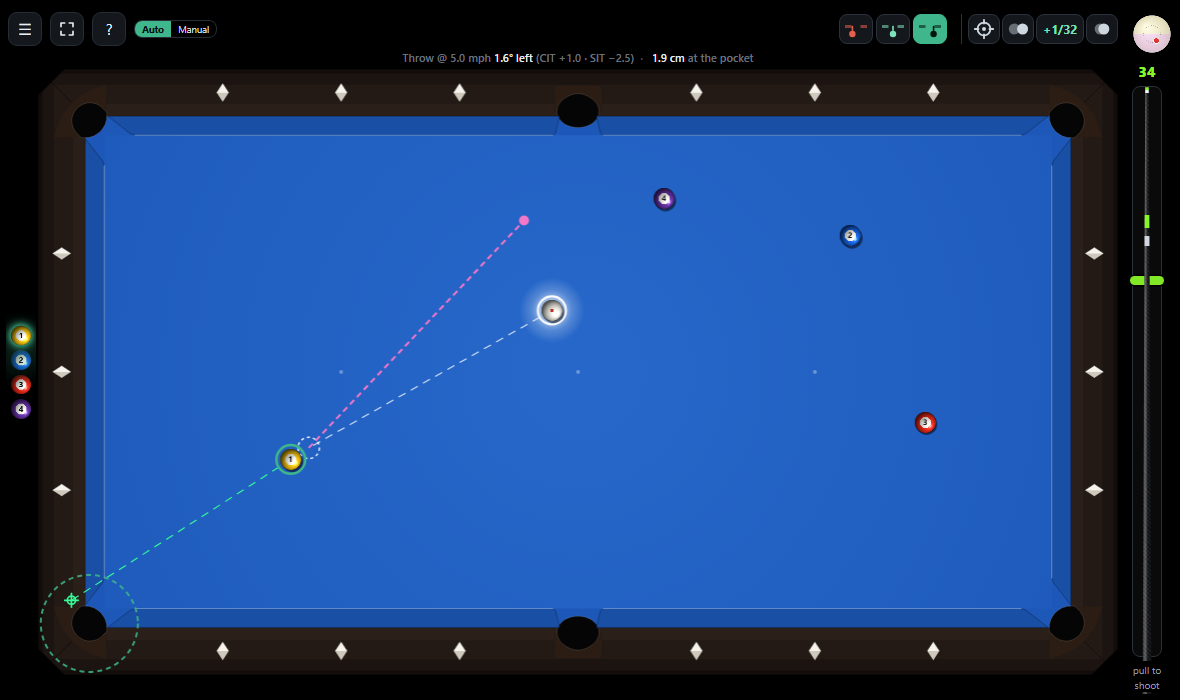
- Open ☰ and tick Guess mode. The game now hides where the cue ball will go after contact.
- Make sure the aim mode is Auto (in Manual a tap on the table sets the aim instead). Look at the position and tap the table where you think the cue ball will head after hitting the object ball. A pink dashed line shows your guess.
- Shoot. In the panel, Your guess error gives the difference in degrees: green under 5°, amber under 12°, red above that.
The panel also shows the 90° rule value for the shot (“a stun cue ball leaves ≈ 81.1° off the aim line”), a good starting point for your guess.
11. Modes and drills
Free play
Random balls on the table, as many as you choose (Balls on the table in ☰, 1 to 10). The 10 ball is always there; the other numbers are drawn at random from 1–9. Press Random for a new layout, or drag balls yourself. Always hit the lowest ball first.
Drills
Choose a drill in Choose a game mode. Every drill has a card in ☰ with How and Goal, a score such as “0/4 · best 0”, and New drill. A run ends on a miss, a wrong-ball hit or a scratch; the dialog then offers the next mode.
| Drill | What to do |
|---|---|
| Rail cut · bring the cue ball back | A ball frozen to the long rail, cut into the top-right corner. Use a slightly thinner hit (Auto finds it) and outside spin so the cue ball returns into the green circle. 4 shots in a row. |
| Wagon wheel off the rail | The same shot five times; each time send the cue ball into a different green circle with follow, draw, side spin and 0, 1 or 2 rails. |
| Down the rail · frozen balls | Four balls frozen to the right rail; pot 1 → 4 in the corners and keep the cue ball on the right half (never past the red line). |
| Cue ball frozen to the short rail | Before every shot the cue ball returns frozen to the middle of the bottom rail. Clear 6 balls into corner pockets in any order. |
| Corner box · 9 balls | Nine balls in a 3×3 square in the top-right corner. Any order, all into that corner, cue ball never across the red line. |
| Corner box on the rails · 8 balls | The box pushed against the cushions, so many shots are rail cuts. Same rules. |
| Split box · both ends | Two boxes, odd numbers at the top, even at the bottom: the cue ball must travel the length of the table. 1 → 8, each into its own corner. |
| Small area · two diamonds | Six balls in the corner; the cue ball must stay above the red line. Balls 1 and 3 into the same pocket. Tiny, exact speed. |
| Line of balls · no cushion | Seven balls in a line; run 1 → 7 with the cue ball never touching a cushion. |
| A to B · 1, 2 and 3 cushions | Pot the same ball three times and send the cue ball into circle B with exactly one, then two, then three cushions: pure speed control. |
Speed
In ☰ the Speed menu replays at 0.25×, 0.5×, 1× or 2×. Use 0.25× to see the contact and the throw in slow motion.
12. The physics: the same as on a real table
What the game simulates
| Real-life effect | In the game |
|---|---|
| Real sizes | Regulation balls (57.15 mm, 170 g) on a 9 ft table (2.54 m × 1.27 m playing surface) with six pockets of real proportions; the pocket shape comes from Dr. Dave Alciatore’s table-difficulty data. Balls are never made bigger or smaller. |
| Ball–ball collision | A slightly inelastic collision with friction between the balls. The friction depends on how fast the two surfaces slip against each other (Alciatore’s measured law). This produces throw: the object ball does not leave exactly along the line of centres (see the diagram). Throw shrinks with speed and changes with spin. |
| Cut angle and the 90° rule | Come out of the collision – they are not coded in. A stop shot leaves almost exactly along the 90° line; the game shows the small difference as “Deviation from the 90° tangent”. |
| Sliding, rolling and spinning | A struck ball first slides, then rolls; a ball spins in place and finally stops. Cloth friction (sliding 0.15, rolling resistance 0.009 – a fast tournament cloth) decides how far each stage lasts: “sliding 82 cm → rolling 91 cm”. Follow and draw act through this friction, so they bend the path after the contact. |
| Cushions | A compliant cushion with friction: the ball loses speed (roughly 10–15 % of it when it hits a lively tournament cushion straight on, more on shallow angles), and side spin changes the rebound angle and the spin itself. |
| The cue strike | The tip hits a point on the ball. The offset gives follow, draw and side spin, and a small squirt (the ball starts slightly away from the side you hit). Hitting higher or lower or more to one side gives more of each effect; harder hits give more spin. |
| Pockets | A ball drops when it arrives within the real mouth and is slow enough; a fast ball can rattle and miss. Deep pockets (high “difficulty” presets are tougher) accept a wider range of angles – this is what the five pocket buttons show. |
| Exact timing | The engine is event-based: it computes exactly when each ball touches another ball, a cushion, a pocket, or changes from sliding to rolling – not frame by frame – so the path you see is the solution, not an approximation of it. |
What you will see (measured in this game)
One cut of about 23° into a corner pocket (9 ft table, cue ball about 1.1 m from the object ball), measured with the game’s own engine. Each row changes only the spin or the speed. The numbers show the real-world tendencies: more speed means less throw, follow reduces throw compared with a slightly-low or centre hit, and side spin adds a spin-induced throw that depends on the side.
| Shot | Object-ball throw | Cue-ball speed just after contact |
|---|---|---|
| Slightly low (stun), 2.2 m/s | 2.3° (all CIT) | 1.0 m/s |
| Centre hit, 2.2 m/s | 1.3° | 1.1 m/s |
| Follow (+0.3), 2.2 m/s | 0.3° | 1.0 m/s |
| Follow (+0.3), slow 1.2 m/s | 0.7° | 0.5 m/s |
| Follow (+0.3), fast 4.0 m/s | 0.25° | 1.9 m/s |
| Left side spin (−0.3), 2.2 m/s | CIT 1.0° and SIT 2.1° (they act in opposite directions: total 1.1° the other way) | 0.9 m/s |
| Right side spin (+0.3), 2.2 m/s | CIT 1.1° and SIT 0.4° (total 0.7°) | 0.9 m/s |
The exact numbers depend on the position and are shown live in the game: try the same shot with different spin and watch the “Throw” line above the table.
What it does not simulate
- Cue elevation: no jump shots, no massé, no curving (swerve) of the cue ball – the cue is always level.
- Miscues, chalk, cloth wear, humidity, a table that is not level, ball wear or dirt – everything is a clean, perfect, new table.
- Rules: there are no fouls, no turns and no scoring of a match; this is a trainer (see the note at the top).
Because the table in the game is perfect, results on a real table will differ a little (cloth, cushions and balls vary and age). The directions and relative sizes of the effects are real, which is what you need to train your eye.
13. Ideas this game teaches
- Ghost ball. The object ball goes in the direction of the line from the ghost-ball position through the object ball. Aim the cue-ball centre at the ghost ball.
- Cut angle. The angle between the cue-ball path and the line object ball → pocket. The thinner the cut, the more sensitive the shot: a small error in aim becomes a large miss at the pocket.
- 90° rule. With a stop shot (no spin) the cue ball leaves along the tangent, at 90° to the object ball’s path.
- 30° rule. With a rolling cue ball and a cut between about 30° and 60°, the cue ball leaves about 30° from the original aim line.
- Follow and draw. Right after the contact the cue ball leaves along the 90° line; then the spin acts through the cloth: follow bends the path forward (toward the object ball’s direction), draw bends it back. More power and more tip offset give more effect.
- Throw (CIT, SIT). Friction between the balls drags the object ball a little off the line of centres. On a long shot a degree or two is many centimetres at the pocket.
- Frozen balls. A ball touching the cushion needs a slightly thinner hit to drop.
- Pocket geometry. Pockets differ in depth and jaw angle; a deep pocket takes a wider range of aims (see the cheat buttons).
14. A simple practice plan
- Day 1 – straight and cut shots. Free play, Auto, no spin. For ten shots, read “cut angle needed” before shooting and compare the cue ball’s exit with the 90° line.
- Day 2 – spin. Repeat one position with centre, follow and draw. Watch the yellow arrow change.
- Day 3 – predict. Tick Guess mode and aim for guess errors below 5°.
- Day 4 – precision. Use Manual, then the thick/thin and cheat buttons to find the real limits of a shot.
- Day 5+ – drills. Start with “Line of balls” and “A to B”, then the corner boxes.
15. Questions
Is it free? Do I need an account? It is free and needs no account. Nothing about your play is sent to a server (see Privacy).
The game says “Rotate your device”. It is built for a wide screen: turn the phone sideways.
The table does not appear or is slow. Reload the page; on slower devices the game lowers its graphics quality automatically.
My shot does not match a real table. The physics engine is a port of the open-source pooltool simulator and is a teaching tool; real cloth, cushions and cues vary (see credits).
Where is the Shoot button? You shoot by pulling the cue bar, which gives you control of the power in one movement.